- Angular Tutorial
- Angular - Home
- Angular - Overview
- Angular - Features
- Angular - Advantages & Disadvantages
- Angular Basics
- Angular - Environment setup
- Angular - First Application
- Angular - MVC Architecture
- Angular Components
- Angular - Components
- Angular - Component Lifecycle
- Angular - View Encapsulation
- Angular - Component Interaction
- Angular - Component Styles
- Angular - Nested Components
- Angular - Content projection
- Angular - Dynamic components
- Angular - Elements
- Angular Templates
- Angular - Templates
- Angular - Template statements
- Angular - Template Variables
- Angular - SVG as Templates
- Angular Binding
- Angular - Data Binding
- Angular - Interpolation
- Angular - Event Binding
- Angular - Property Binding
- Angular - Attribute Binding
- Angular - Class Binding
- Angular - Style Binding
- Angular - Two-way Binding
- Angular Directives
- Angular - Directives
- Angular - Attribute Directives
- Angular - Structural Directives
- Angular - Custom Directives
- Angular Pipes
- Angular - Pipes
- Angular - Built-in Pipes
- Angular - Custom Pipes
- Angular Forms
- Angular - Forms
- Angular - Template Driven Forms
- Angular - Reactive Forms
- Angular - Form Validation
- Angular - Dynamic Forms
- Angular Dependency Injection
- Angular - Dependency Injection
- Angular - Injectable Service
- Angular Routing
- Angular - Routing
- Angular - Dynamic Routes
- Angular - Wildcard Routes
- Angular - Nested Routes
- Angular - Navigation
- Angular - Routing in SPA
- Angular - Custom Route Matches
- Angular - Router Reference
- Angular HTTP Client programming
- Angular - Services
- Angular - HTTP Client
- Angular - Request
- Angular - Response
- Angular - GET
- Angular - POST
- Angular - PUT
- Angular - DELETE
- Angular - JSONP
- Angular - CRUD Operations Using HTTP
- Angular Modules
- Angular - Introduction to Modules
- Angular - Root Module
- Angular - Feature Module
- Angular - Sharing Module
- Angular - Routing Module
- Angular - NgModules
- Angular Animation
- Angular - Animations
- Angular Service Workers & PWA
- Angular - Service Workers & PWA
- Angular Testing
- Angular - Testing Overview
- Angular Design Patterns
- Angular - Design Patterns
- Angular - Lazy Loading
- Angular - Singleton Pattern
- Angular - Observer Pattern
- Angular Libraries
- Angular - Libraries
- Angular - Angular Material
- Angular - PrimeNG
- Angular - RxJS
- Angular Advanced
- Angular - Signals
- Angular - Authentication & Authorization
- Angular - Internationalization
- Angular - Standalone Component
- Angular - Accessibility
- Angular - Web Workers
- Angular - Server Side Rendering
- Angular - Ivy Compiler
- Angular - Building with Bazel
- Angular - Backward Compatibility
- Angular - Reactive Programming
- Angular Tools
- Angular - CLI
- Angular Material UI Elements
- Angular - Paginator
- Angular - Datepicker
- Angular - Select Drop-down
- Angular Miscellaneous
- Angular - Third Party Controls
- Angular - Configuration
- Angular - Displaying Data
- Angular - Decorators & Metadata
- Angular - Basic Example
- Angular - Error Handling
- Angular - Testing & Building a Project
- Angular - Lifecycle Hooks
- Angular - User Input
- Angular - What's New?
- Angular Useful Resources
- Angular - Quick Guide
- Angular - Useful Resources
- Angular - Discussion
Angular - Routing
What is Routing?
In web development, routing is a technique for navigating between different views or pages in a an application. It allows the application to determine which page to display based on the URL requested by the user.
Routing in Angular
In Angular, routing is used to develop a single-page applications (SPAs). Although, an SPA does not support multipage navigation, it allows navigation from one view (component) to another without reloading the entire page. You can define the routes for different components to navigate when the URL changes.
Below is the snippet of code of how routes are defined for different components:
routes = [ {path: 'home', component: HomeComponent}, {path: 'about', component: AboutComponent} ] Here,
- routes: An array contains all the routes for different components.
- path: A path, which you can access on the URL to load the target component.
- component: A target component will be loaded when the path is active on the URL.
When you create a new application, an app.routes.ts file will automatically generated, where you can define these routes for navigation.
The diagram below will give you a clear understanding of how routing works in Angular when the user clicks on a link to navigate to a different component:

Types of routes in Angular
- Static routes: These are the simple routes that map a specific URL path to a component.
{path: 'path-name', component: component-name} These routes are use parameters in the URL to dynamically load different entities of a components based on current paramter pased in URL:
{path: 'path-name/:parameter', component: component-name} {path: '**', component: component-name} { path: 'parent-path', loadChildren: [ {path: 'child-path1', component: component-name}, {path: 'child-path2', component: component-name} ] } Configure Routing in Angular
To configure a static (basic) routing in our Angular application, the Angular CLI (command line interface) provides comprehensive support for setting up routing both during the application creation process and while working on an existing application.
Let's create a new application with routing enabled using the command below:
ng new routing-app --routing
Even if you do not provide the --routing flag, the above command will generate a new file named app.routes.ts by default:
import { Routes } from '@angular/router'; export const routes: Routes = []; Here,
Imports Routes from '@angular/router' package.
Routes provides functionality to configure and execute routing in the application.
Routes is the type used to setup the navigation rules.
Routes is the local variable (of type Routes) used to configure the actual navigation rules of the application.
Defining Routes
To define routes in your Angular application that redirect to different components when the URL changes, follow the steps below:
Step 1: Add your routes to your application
Open the app.routes.ts file and place the below code:
import { Routes } from '@angular/router'; import { HomeComponent } from './home/home.component'; import { AboutComponent } from './about/about.component'; export const routes: Routes = [ {path: 'home', component: HomeComponent}, {path: 'about', component: AboutComponent} ]; Here,
- home and about are paths that will be used in the URL to navigate to the "Home" and "About" components.
- HomeComponent and AboutComponent are the target component or destination.
- When the URL changes "/home" and "/about", the matched component will be called and rendered.
Adding routes in Configuration file
Make sure that the generated routes are added in the Configuration file (app.config.ts) otherwise, you might get an error:
import { ApplicationConfig } from '@angular/core'; import { provideRouter } from '@angular/router'; import { routes } from './app.routes'; import { provideClientHydration } from '@angular/platform-browser'; export const appConfig: ApplicationConfig = { providers: [provideRouter(routes), provideClientHydration()] }; Adding 'router-outlet' in root Component
To work with routing, you need to include the <router-outlet>directive in your root component (recommended to add in app.component.html.), where you want to display the loaded components.
Including the "router-outlet" directive in app.component.html:
<h1>Angular Routing</h1> <router-outlet></router-outlet>
Testing the Routing
To test the routing, run the application and try to navigate to "/home" and "/about" by changing the URL:

Using RouterLink for Navigation
Rather than changing the URL manually, you can use the RouterLink directive. The RouterLink directive is used to set a path for navigating between views or components in an Angular application.
Binding a specified path in app.routes.ts with an anchor element (<a>) to handle navigation when links are clicked:
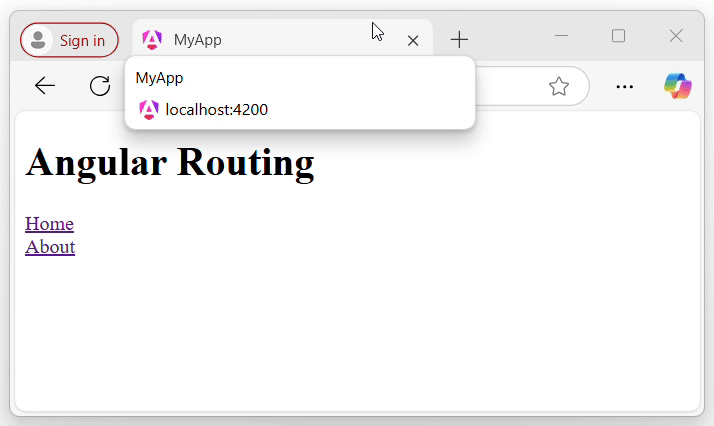
<h1>Angular Routing</h1> <a routerLink="/home">Home</a><br> <a routerLink="/about">About</a> <router-outlet></router-outlet>
The output will look like:
Here,
- routerLink set the route to be called using the path.
Note: Make sure that all the necessary modules and dependencies such as RouterOutlet, RouterLink, and CommonModule should be added to your root component.
Multiple Choice Questions (MCQ's):
Here we have mentioned a few MCQs to test your knowledge on the current concept:
Q 1 − What is the purpose of Angular Router?
A − To manage server-side routing.
B − To manage client-side navigation.
Answer : B
Explanation:
Angular Router is used to manage the client-side navigation. It enables developers to create Single Page Applications (SPA).
Q 2 − Which decorator is used to define routes in Angular?
Answer : D
Explanation:
In Angular, the @RouteConfig decorator is used to define route configurations in Angular.
Q 3 − How can you pass parameters in Angular routes?
Answer : C
Explanation:
You can pass parameters in Angular routes using both URL segments and query strings. For example, /user/:id for URL segments and /user?id=1 for query strings.
Q 4 − Which method is used to navigate between routes programmatically in Angular?
Answer : B
Explanation:
The Router.navigate() method is used to navigate between routes programmatically in Angular.
Q 5 − Which method is used to navigate between routes programmatically in Angular?
A − To display the default component.
B − To switch between different templates.
C − To act as a placeholder for dynamically loaded components based on the current route.
Answer : C
Explanation:
The RouterOutlet directive acts as a placeholder that marks where the router should display the component for the active route.