- Angular Tutorial
- Angular - Home
- Angular - Overview
- Angular - Features
- Angular - Advantages & Disadvantages
- Angular Basics
- Angular - Environment setup
- Angular - First Application
- Angular - MVC Architecture
- Angular Components
- Angular - Components
- Angular - Component Lifecycle
- Angular - View Encapsulation
- Angular - Component Interaction
- Angular - Component Styles
- Angular - Nested Components
- Angular - Content projection
- Angular - Dynamic components
- Angular - Elements
- Angular Templates
- Angular - Templates
- Angular - Template statements
- Angular - Template Variables
- Angular - SVG as Templates
- Angular Binding
- Angular - Data Binding
- Angular - Interpolation
- Angular - Event Binding
- Angular - Property Binding
- Angular - Attribute Binding
- Angular - Class Binding
- Angular - Style Binding
- Angular - Two-way Binding
- Angular Directives
- Angular - Directives
- Angular - Attribute Directives
- Angular - Structural Directives
- Angular - Custom Directives
- Angular Pipes
- Angular - Pipes
- Angular - Built-in Pipes
- Angular - Custom Pipes
- Angular Forms
- Angular - Forms
- Angular - Template Driven Forms
- Angular - Reactive Forms
- Angular - Form Validation
- Angular - Dynamic Forms
- Angular Dependency Injection
- Angular - Dependency Injection
- Angular - Injectable Service
- Angular Routing
- Angular - Routing
- Angular - Dynamic Routes
- Angular - Wildcard Routes
- Angular - Nested Routes
- Angular - Navigation
- Angular - Routing in SPA
- Angular - Custom Route Matches
- Angular - Router Reference
- Angular HTTP Client programming
- Angular - Services
- Angular - HTTP Client
- Angular - Request
- Angular - Response
- Angular - GET
- Angular - POST
- Angular - PUT
- Angular - DELETE
- Angular - JSONP
- Angular - CRUD Operations Using HTTP
- Angular Modules
- Angular - Introduction to Modules
- Angular - Root Module
- Angular - Feature Module
- Angular - Sharing Module
- Angular - Routing Module
- Angular - NgModules
- Angular Animation
- Angular - Animations
- Angular Service Workers & PWA
- Angular - Service Workers & PWA
- Angular Testing
- Angular - Testing Overview
- Angular Design Patterns
- Angular - Design Patterns
- Angular - Lazy Loading
- Angular - Singleton Pattern
- Angular - Observer Pattern
- Angular Libraries
- Angular - Libraries
- Angular - Angular Material
- Angular - PrimeNG
- Angular - RxJS
- Angular Advanced
- Angular - Signals
- Angular - Authentication & Authorization
- Angular - Internationalization
- Angular - Standalone Component
- Angular - Accessibility
- Angular - Web Workers
- Angular - Server Side Rendering
- Angular - Ivy Compiler
- Angular - Building with Bazel
- Angular - Backward Compatibility
- Angular - Reactive Programming
- Angular Tools
- Angular - CLI
- Angular Material UI Elements
- Angular - Paginator
- Angular - Datepicker
- Angular - Select Drop-down
- Angular Miscellaneous
- Angular - Third Party Controls
- Angular - Configuration
- Angular - Displaying Data
- Angular - Decorators & Metadata
- Angular - Basic Example
- Angular - Error Handling
- Angular - Testing & Building a Project
- Angular - Lifecycle Hooks
- Angular - User Input
- Angular - What's New?
- Angular Useful Resources
- Angular - Quick Guide
- Angular - Useful Resources
- Angular - Discussion
Angular - Attribute Directives
What are Attribute Directives?
Attribute directives change the appearance or behavior of DOM elements or components. It is used just like a normal HTML attribute. However, the directive should be enclosed within square brackets [ ] to bind it to the element.
Built-in Attribute Directives
The most commonly used attribute directives are as follows −
ngStyle: It is used to add dynamic styles.
ngClass: It adds or removes CSS classes in HTML elements.
ngModel: This directive is used for two-way binding.

NOTE: To use ngStyle and ngClass directive, importing CommonModule is necessary as they are part of this module. For ngModel, we are required to import FormsModule.
The ngStyle Directive
The ngStyle directive is used to add dynamic styles. You can set one or more style properties using key-value pairs separated by a colon. Here, key is the name of style and the value is an expression that gets calculated. If the result is null, no style will be applied to the element.
Example
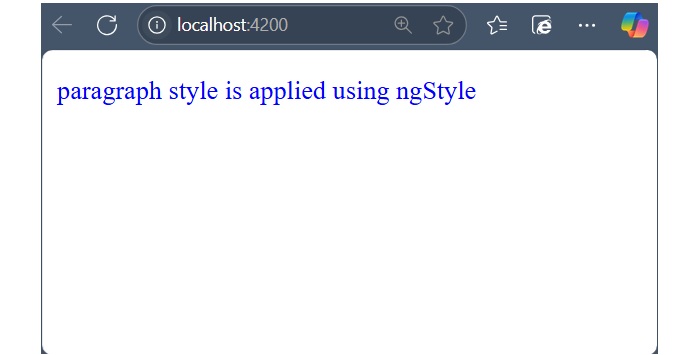
The example below shows how to apply blue color to the paragraph using ngStyle directive.
Step 1: Create a directive-app application using the below command:
ng new directive-app
Step 2: Add the below content in app.component.html file.
<p [ngStyle]="{'color': 'blue', 'font-size': '14px'}"> paragraph style is applied using ngStyle </p> <router-outlet /> Step 3: Import CommonModule inside app.component.ts file:
import { Component } from '@angular/core'; import { RouterOutlet } from '@angular/router'; import { CommonModule } from '@angular/common'; @Component({ selector: 'app-root', standalone: true, imports: [RouterOutlet, CommonModule], templateUrl: './app.component.html', styleUrl: './app.component.css' }) export class AppComponent { title = 'directive-app'; } Step 4: Start your application (if not done already) using the below command −
ng serve
Now, run your application and you can see the below response −
The ngClass Directive
The ngClass directive is used to add or remove CSS classes in HTML elements. The CSS classes are updated based on given conditions or type of expression.
If the expression is a string, the CSS classes specified in the string are added. If it's an array, the CSS classes listed as array elements are added. And, if the expression is an object, the keys represent CSS classes that will be added when their corresponding values are evaluated to a truthy value and removed when their values are falsy.
Example
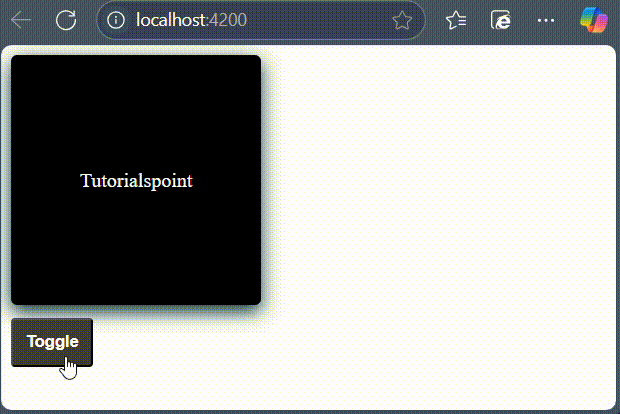
Let's try ngClass directive in our directive-app application.
Step 1: Change the above code of the app.component.html file with the following code:
<div [ngClass] = "dark"> Tutorialspoint </div> <button (click) = "changeBckgrd()">Toggle</button> <router-outlet />
Step 2: Open app.component.ts file and add the below changes −
import { Component } from '@angular/core'; import { RouterOutlet } from '@angular/router'; import { CommonModule } from '@angular/common'; @Component({ selector: 'app-root', standalone: true, imports: [RouterOutlet, CommonModule], templateUrl: './app.component.html', styleUrl: './app.component.css' }) export class AppComponent { title = 'directive-app'; dark = ""; changeBckgrd() { if(this.dark == "") { this.dark = "darkCol"; } else { this.dark = ""; } } } Step 3: Now, open app.component.css file and add the below code:
div { width: 200px; height: 200px; border-radius: 5px; box-shadow: 0px 5px 15px rgb(6, 51, 51); text-align: center; align-items: center; justify-content: center; display: flex; } button { border-radius: 3px; margin: 10px auto; padding: 10px 10px; color: white; font-weight: bold; background-color: rgb(66, 59, 59); cursor: pointer; } .darkCol { background-color: black; color: white; transition: background-color 0.5s; } Step 4: Finally, start your application (if not done already) using the below command −
ng serve
Now, run your application and you can see the below response −
The ngModel Directive
The ngModel is a built-in attribute directive. It is mostly used to enable two-way data binding for HTML form elements with the help of banana-in-a-box syntax "[()]". However, you if you use ngModel in square bracket [] syntax, it will enable the one-way binding.
The ngModel directive is provided by a separate module called FormsModule, which is necessary for template-driven forms.
Example
A simple example of two way binding is given below. Here, a user object with name property is defined. Whenever user change the input field, the updated user name will be reflected to the user.name variable in the component. Similarly, if the components variable, user.name gets changed, the input fields value will be updated as well.
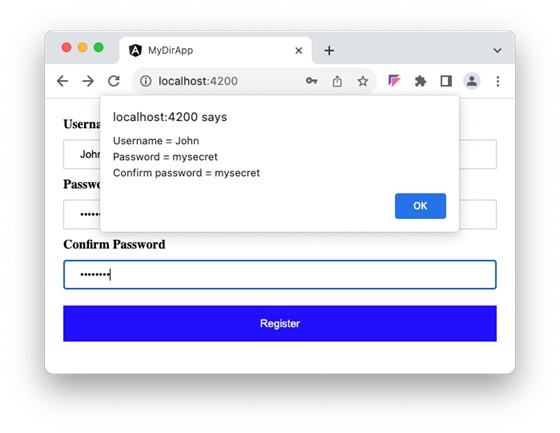
Let us create a simple registration form to understand ngModel directive. Our registration form will have three input fields as shown below and a button to submit the registration form:
- Username
- Password
- Confirm password
Step 1: Create a new application, my-app using angular CLI as shown below −
ng new my-app
Step 2: Create a new registration form component, RegisterForm using angular CLI as shown below −
ng generate component RegisterForm
Step 3: Open the registration form component's template and a user with username, password and confirm password.
<div> <form method="post"> <div class="container"> <label for="username"><b>Username</b></label> <input type="text" name="username" [(ngModel)]="user.username" required> <label for="password"><b>Password</b></label> <input type="password" name="password" [(ngModel)]="user.password" required> <label for="confirm_password"><b>Confirm Password</b></label> <input type="password" name="confirm_password" [(ngModel)]="user.confirmPassword" required> <button type="submit" (click)="showInfo($event)">Register</button> </div> </form> </div>
Here, ngModel sets the value from "user" object to HTML input element. It sets the user-entered value to the user object in the reverse direction as well.
Step 4: Open the registration form component's style and add some CSS to the form as shown below −
.container { padding: 15px; } input[type=text], input[type=password] { width: 100%; padding: 10px 20px; margin: 10px 0; display: inline-block; border: 1px solid #ccc; box-sizing: border-box; } button { background-color: blue; color: white; padding: 15px 20px; margin: 10px 0; border: none; cursor: pointer; width: 100%; } Step 5: Include our registration form component in the app template file, app.component.html:
<app-register-form></app-register-form> <router-outlet />
Step 6: Next, add an object named "user" with username, password and confirmPassword properties. The "user" object will have an empty string initially. Once the user enters the data, it will get populated through NgModel directive.
user: any = { username: '', password: '', confirmPassword: '' } Step 7: Create a new member method, showInfo() in the component class. The purpose of the method is to collect the current user information and show it through alert() method.
showInfo(e: Event) { e.preventDefault(); let info: string = ''; info += 'Username = ' + this.user.username; info += '\nPassword = ' + this.user.password; info += '\nConfirm password = ' + this.user.confirmPassword; alert(info) } Here,
preventDefault() method of the event object will prevent the default action of submit button.
alert() method will show the message to the user.
Step 8: The complete listing of the component i.e. register-form.component.ts is as follows:
import { Component } from '@angular/core'; import { FormsModule } from '@angular/forms'; @Component({ selector: 'app-register-form', standalone: true, imports: [FormsModule], templateUrl: './register-form.component.html', styleUrl: './register-form.component.css' }) export class RegisterFormComponent { user: any = { username: '', password: '', confirmPassword: '' } showInfo(e: Event) { e.preventDefault(); let info: string = ''; info += 'Username = ' + this.user.username; info += '\nPassword = ' + this.user.password; info += '\nConfirm password = ' + this.user.confirmPassword; alert(info) } } Step 9: Before running the application, add the RegisterFormComponent to the app.component.ts file.
import { Component } from '@angular/core'; import { RouterOutlet } from '@angular/router'; import { RegisterFormComponent } from './register-form/register-form.component'; @Component({ selector: 'app-root', standalone: true, imports: [RouterOutlet, RegisterFormComponent], templateUrl: './app.component.html', styleUrl: './app.component.css' }) export class AppComponent { title = 'my-app'; } Step 10: Now, run the application, fill out the form and click the register button. It will collect the information through ngModel binding and show it through the alert() function.
Multiple Choice Questions on Angular Attribute Directives
In this section, test your knowledge of the angular attribute directives by giving correct answers to the MCQs given below −
Q. 1 - An angular attribute directive is used to:
B - change the appearance or behavior of DOM elements or components
Answer : B
Explanation
An attribute directive change the appearance or behavior of DOM elements or components. It is used just like a normal HTML attribute.
Q. 2 - Which of the following directives is used to add dynamic styles to an element in Angular?
Answer : A
Explanation
The ngStyle directive is used to add dynamic styles.
Q. 3 - Which module needs to be imported to use ngStyle and ngClass in an Angular application?
Answer : D
Explanation
To use ngStyle and ngClass directive, importing CommonModule is necessary as they are part of this module.