Scheduling queries
This page describes how to schedule recurring queries in BigQuery.
You can schedule queries to run on a recurring basis. Scheduled queries must be written in GoogleSQL, which can include data definition language (DDL) and data manipulation language (DML) statements. You can organize query results by date and time by parameterizing the query string and destination table.
When you create or update the schedule for a query, the scheduled time for the query is converted from your local time to UTC. UTC is not affected by daylight saving time.
Before you begin
- Scheduled queries use features of BigQuery Data Transfer Service. Verify that you have completed all actions required in Enabling BigQuery Data Transfer Service.
- Grant Identity and Access Management (IAM) roles that give users the necessary permissions to perform each task in this document.
- If you plan on specifying a customer-managed encryption key (CMEK), ensure that your service account has permissions to encrypt and decrypt, and that you have the Cloud KMS key resource ID required to use CMEK. For information about how CMEKs works with the BigQuery Data Transfer Service, see Specify encryption key with scheduled queries.
Required permissions
To schedule a query, you need the following IAM permissions:
To create the transfer, you must either have the
bigquery.transfers.updateandbigquery.datasets.getpermissions, or thebigquery.jobs.create,bigquery.transfers.get, andbigquery.datasets.getpermissions.To run a scheduled query, you must have:
bigquery.datasets.getpermissions on the target datasetbigquery.jobs.create
To modify or delete a scheduled query, you must either have the bigquery.transfers.update and bigquery.transfers.get permissions, or the bigquery.jobs.create permission and ownership over the scheduled query.
The predefined BigQuery Admin (roles/bigquery.admin) IAM role includes the permissions that you need in order to schedule or modify a query.
For more information about IAM roles in BigQuery, see Predefined roles and permissions.
To create or update scheduled queries run by a service account, you must have access to that service account. For more information on granting users the service account role, see Service Account user role. To select a service account in the scheduled query UI of the Google Cloud console, you need the following IAM permissions:
iam.serviceAccounts.list
Configuration options
The following sections describe the configuration options.
Query string
The query string must be valid and written in GoogleSQL. Each run of a scheduled query can receive the following query parameters.
To manually test a query string with @run_time and @run_date parameters before scheduling a query, use the bq command-line tool.
Available parameters
| Parameter | GoogleSQL Type | Value |
|---|---|---|
@run_time | TIMESTAMP | Represented in UTC time. For regularly scheduled queries, run_time represents the intended time of execution. For example, if the scheduled query is set to "every 24 hours", the run_time difference between two consecutive queries is exactly 24 hours, even though the actual execution time might slightly vary. |
@run_date | DATE | Represents a logical calendar date. |
Example
The @run_time parameter is part of the query string in this example, which queries a public dataset named hacker_news.stories.
SELECT@run_timeAStime,title,author,textFROM`bigquery-public-data.hacker_news.stories`LIMIT1000
Destination table
If the destination table for your results doesn't exist when you set up the scheduled query, BigQuery attempts to create the table for you.
If you are using a DDL or DML query, then in the Google Cloud console, choose the Processing location or region. Processing location is required for DDL or DML queries that create the destination table.
If the destination table does exist and you are using the WRITE_APPENDwrite preference, BigQuery appends data to the destination table and tries to map the schema. BigQuery automatically allows field additions and reordering, and accommodates missing optional fields. If the table schema changes so much between runs that BigQuery can't process the changes automatically, the scheduled query fails.
Queries can reference tables from different projects and different datasets. When configuring your scheduled query, you don't need to include the destination dataset in the table name. You specify the destination dataset separately.
The destination dataset and table for a scheduled query must be in the same project as the scheduled query.
Write preference
The write preference you select determines how your query results are written to an existing destination table.
WRITE_TRUNCATE: If the table exists, BigQuery overwrites the table data.WRITE_APPEND: If the table exists, BigQuery appends the data to the table.
If you're using a DDL or DML query, you can't use the write preference option.
Creating, truncating, or appending a destination table only happens if BigQuery is able to successfully complete the query. Creation, truncation, or append actions occur as one atomic update upon job completion.
Clustering
Scheduled queries can create clustering on new tables only, when the table is made with a DDL CREATE TABLE AS SELECT statement. See Creating a clustered table from a query result on the Using data definition language statements page.
Partitioning options
Scheduled queries can create partitioned or non-partitioned destination tables. Partitioning is available in the Google Cloud console, bq command-line tool, and API setup methods. If you're using a DDL or DML query with partitioning, leave the Destination table partitioning field blank.
You can use the following types of table partitioning in BigQuery:
- Integer range partitioning: Tables partitioned based on ranges of values in a specific
INTEGERcolumn. - Time-unit column partitioning: Tables partitioned based on a
TIMESTAMP,DATE, orDATETIMEcolumn. - Ingestion time partitioning: Tables partitioned by ingestion time. BigQuery automatically assigns rows to partitions based on the time when BigQuery ingests the data.
To create a partitioned table by using a scheduled query in the Google Cloud console, use the following options:
To use integer range partitioning, leave the Destination table partitioning field blank.
To use time-unit column partitioning, specify the column name in the Destination table partitioning field when you set up a scheduled query.
To use ingestion time partitioning, leave the Destination table partitioning field blank and indicate the date partitioning in the destination table's name. For example,
mytable${run_date}. For more information, see Parameter templating syntax.
Available parameters
When setting up the scheduled query, you can specify how you want to partition the destination table with runtime parameters.
| Parameter | Template Type | Value |
|---|---|---|
run_time | Formatted timestamp | In UTC time, per the schedule. For regularly scheduled queries, run_time represents the intended time of execution. For example, if the scheduled query is set to "every 24 hours", the run_time difference between two consecutive queries is exactly 24 hours, even though the actual execution time may vary slightly.See TransferRun.runTime. |
run_date | Date string | The date of the run_time parameter in the following format: %Y-%m-%d; for example, 2018-01-01. This format is compatible with ingestion-time partitioned tables. |
Templating system
Scheduled queries support runtime parameters in the destination table name with a templating syntax.
Parameter templating syntax
The templating syntax supports basic string templating and time offsetting. Parameters are referenced in the following formats:
{run_date}{run_time[+\-offset]|"time_format"}
| Parameter | Purpose |
|---|---|
run_date | This parameter is replaced by the date in format YYYYMMDD. |
run_time | This parameter supports the following properties:
|
- No whitespace is allowed between run_time, offset, and time format.
- To include literal curly braces in the string, you can escape them as
'\{' and '\}'. - To include literal quotes or a vertical bar in the time_format, such as
"YYYY|MM|DD", you can escape them in the format string as:'\"'or'\|'.
Parameter templating examples
These examples demonstrate specifying destination table names with different time formats, and offsetting the run time.| run_time (UTC) | Templated parameter | Output destination table name |
|---|---|---|
| 2018-02-15 00:00:00 | mytable | mytable |
| 2018-02-15 00:00:00 | mytable_{run_time|"%Y%m%d"} | mytable_20180215 |
| 2018-02-15 00:00:00 | mytable_{run_time+25h|"%Y%m%d"} | mytable_20180216 |
| 2018-02-15 00:00:00 | mytable_{run_time-1h|"%Y%m%d"} | mytable_20180214 |
| 2018-02-15 00:00:00 | mytable_{run_time+1.5h|"%Y%m%d%H"}or mytable_{run_time+90m|"%Y%m%d%H"} | mytable_2018021501 |
| 2018-02-15 00:00:00 | {run_time+97s|"%Y%m%d"}_mytable_{run_time+97s|"%H%M%S"} | 20180215_mytable_000137 |
Using a service account
You can set up a scheduled query to authenticate as a service account. A service account is a special account associated with your Google Cloud project. The service account can run jobs, such as scheduled queries or batch processing pipelines, with its own service credentials rather than an end user's credentials.
Read more about authenticating with service accounts in Introduction to authentication.
You can set up the scheduled query with a service account. If you signed in with a federated identity, then a service account is required to create a transfer. If you signed in with a Google Account, then a service account for the transfer is optional.
You can update an existing scheduled query with the credentials of a service account with the bq command-line tool or Google Cloud console. For more information, see Update scheduled query credentials.
Specify encryption key with scheduled queries
You can specify customer-managed encryption keys (CMEKs) to encrypt data for a transfer run. You can use a CMEK to support transfers from scheduled queries.When you specify a CMEK with a transfer, the BigQuery Data Transfer Service applies the CMEK to any intermediate on-disk cache of ingested data so that the entire data transfer workflow is CMEK compliant.
You cannot update an existing transfer to add a CMEK if the transfer was not originally created with a CMEK. For example, you cannot change a destination table that was originally default encrypted to now be encrypted with CMEK. Conversely, you also cannot change a CMEK-encrypted destination table to have a different type of encryption.
You can update a CMEK for a transfer if the transfer configuration was originally created with a CMEK encryption. When you update a CMEK for a transfer configuration, the BigQuery Data Transfer Service propagates the CMEK to the destination tables at the next run of the transfer, where the BigQuery Data Transfer Service replaces any outdated CMEKs with the new CMEK during the transfer run. For more information, see Update a transfer.
You can also use project default keys. When you specify a project default key with a transfer, the BigQuery Data Transfer Service uses the project default key as the default key for any new transfer configurations.
Set up scheduled queries
For a description of the schedule syntax, see Formatting the schedule. For details about schedule syntax, see Resource: TransferConfig.
Console
Open the BigQuery page in the Google Cloud console.
Run the query that you're interested in. When you are satisfied with your results, click Schedule.

The scheduled query options open in the New scheduled query pane.
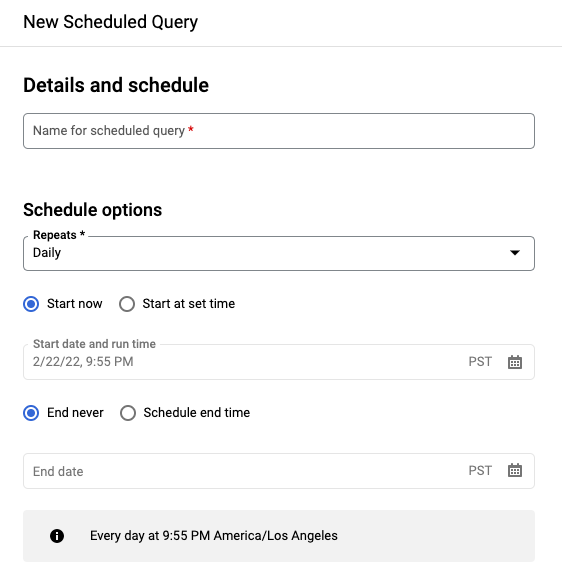
On the New scheduled query pane:
- For Name for the scheduled query, enter a name such as
My scheduled query. The scheduled query name can be any value that you can identify later if you need to modify the query. Optional: By default, the query is scheduled to run Daily. You can change the default schedule by selecting an option from the Repeats drop-down menu:
To specify a custom frequency, select Custom, then enter a Cron-like time specification in the Custom schedule field— for example,
every mon 23:30orevery 6 hours. For details about valid schedules including custom intervals, see theschedulefield under Resource:TransferConfig.
To change the start time, select the Start at set time option, enter the selected start date and time.
To specify an end time, select the Schedule end time option, enter the selected end date and time.
To save the query without a schedule, so you can run it on demand later, select On-demand in the Repeats menu.
- For Name for the scheduled query, enter a name such as
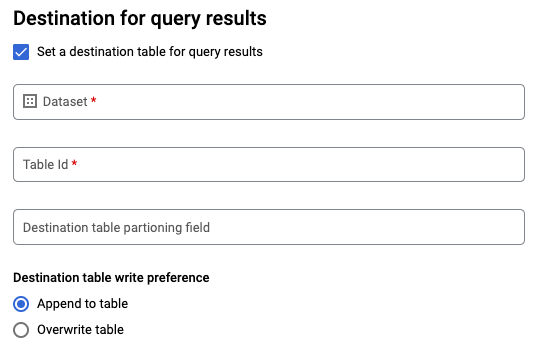
For a GoogleSQL
SELECTquery, select the Set a destination table for query results option and provide the following information about the destination dataset.- For Dataset name, choose the appropriate destination dataset.
- For Table name, enter the name of your destination table.
For Destination table write preference, choose either Append to table to append data to the table or Overwrite table to overwrite the destination table.
Choose the Location Type.
If you have enabled the destination table for query results, you can select Automatic location selection to automatically select the location where the destination table resides.
Otherwise, choose the location where the data being queried is located.
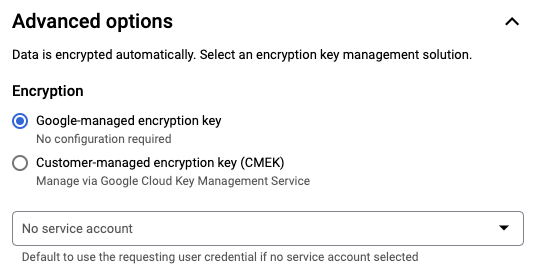
Advanced options:
Optional: CMEK If you use customer-managed encryption keys, you can select Customer-managed key under Advanced options. A list of your available CMEKs appears for you to choose from. For information about how customer-managed encryption keys (CMEKs) work with the BigQuery Data Transfer Service, see Specify encryption key with scheduled queries.
Authenticate as a service account If you have one or more service accounts associated with your Google Cloud project, you can associate a service account with your scheduled query instead of using your user credentials. Under Scheduled query credential, click the menu to see a list of your available service accounts. A service account is required if you are signed in as a federated identity.
Additional configurations:
Optional: Check Send email notifications to allow email notifications of transfer run failures.
Optional: For Pub/Sub topic, enter your Pub/Sub topic name, for example:
projects/myproject/topics/mytopic.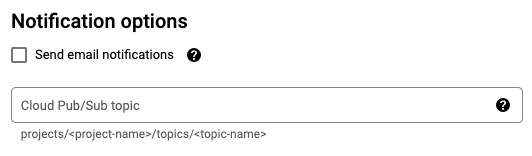
Click Save.
bq
Option 1: Use the bq query command.
To create a scheduled query, add the options destination_table (or target_dataset), --schedule, and --display_name to your bq query command.
bqquery\ --display_name=name\ --destination_table=table\ --schedule=interval
Replace the following:
name. The display name for the scheduled query. The display name can be any value that you can identify later if you need to modify the query.table. The destination table for the query results.--target_datasetis an alternative way to name the target dataset for the query results, when used with DDL and DML queries.- Use either
--destination_tableor--target_dataset, but not both.
interval. When used withbq query, makes a query a recurring scheduled query. A schedule for how often the query should run is required. For details about valid schedules including custom intervals, see theschedulefield under Resource:TransferConfig. Examples:--schedule='every 24 hours'--schedule='every 3 hours'--schedule='every monday 09:00'--schedule='1st sunday of sep,oct,nov 00:00'
Optional flags:
--project_idis your project ID. If--project_idisn't specified, the default project is used.--replaceoverwrites the destination table with the query results after every run of the scheduled query. Any existing data is erased. For non-partitioned tables, the schema is also erased.--append_tableappends results to the destination table.For DDL and DML queries, you can also supply the
--locationflag to specify a particular region for processing. If--locationisn't specified, the nearest Google Cloud location is used.
For example, the following command creates a scheduled query named My Scheduled Query using the query SELECT 1 from mydataset.test. The destination table is mytable in the dataset mydataset. The scheduled query is created in the default project:
bq query \ --use_legacy_sql=false \ --destination_table=mydataset.mytable \ --display_name='My Scheduled Query' \ --schedule='every 24 hours' \ --replace=true \ 'SELECT 1 FROM mydataset.test'
Option 2: Use the bq mk command.
Scheduled queries are a kind of transfer. To schedule a query, you can use the bq command-line tool to make a transfer configuration.
Queries must be in StandardSQL dialect to be scheduled.
Enter the bq mk command and supply the following required flags:
--transfer_config--data_source--target_dataset(optional for DDL and DML queries)--display_name--params
Optional flags:
--project_idis your project ID. If--project_idisn't specified, the default project is used.--scheduleis how often you want the query to run. If--scheduleisn't specified, the default is 'every 24 hours' based on creation time.For DDL and DML queries, you can also supply the
--locationflag to specify a particular region for processing. If--locationisn't specified, the nearest Google Cloud location is used.--service_account_nameis for authenticating your scheduled query with a service account instead of your individual user account.--destination_kms_keyspecifies the key resource ID for the key if you use a customer-managed encryption key (CMEK) for this transfer. For information about how CMEKs work with the BigQuery Data Transfer Service, see Specify encryption key with scheduled queries.
bqmk\ --transfer_config\ --target_dataset=dataset\ --display_name=name\ --params='parameters'\ --data_source=data_source
Replace the following:
dataset. The target dataset for the transfer configuration.- This parameter is optional for DDL and DML queries. It is required for all other queries.
name. The display name for the transfer configuration. The display name can be any value that you can identify later if you need to modify the query.parameters. Contains the parameters for the created transfer configuration in JSON format. For example:--params='{"param":"param_value"}'.- For a scheduled query, you must supply the
queryparameter. - The
destination_table_name_templateparameter is the name of your destination table.- This parameter is optional for DDL and DML queries. It is required for all other queries.
- For the
write_dispositionparameter, you can chooseWRITE_TRUNCATEto truncate (overwrite) the destination table orWRITE_APPENDto append the query results to the destination table.- This parameter is optional for DDL and DML queries. It is required for all other queries.
- For a scheduled query, you must supply the
data_source. The data source:scheduled_query.- Optional: The
--service_account_nameflag is for authenticating with a service account instead of an individual user account. - Optional: The
--destination_kms_keyspecifies the key resource ID for the Cloud KMS key—for example,projects/project_name/locations/us/keyRings/key_ring_name/cryptoKeys/key_name.
For example, the following command creates a scheduled query transfer configuration named My Scheduled Query using the query SELECT 1 from mydataset.test. The destination table mytable is truncated for every write, and the target dataset is mydataset. The scheduled query is created in the default project, and authenticates as a service account:
bqmk\--transfer_config \--target_dataset=mydataset \--display_name='My Scheduled Query' \--params='{"query":"SELECT 1 from mydataset.test","destination_table_name_template":"mytable","write_disposition":"WRITE_TRUNCATE"}' \--data_source=scheduled_query \--service_account_name=abcdef-test-sa@abcdef-test.iam.gserviceaccount.com The first time you run the command, you receive a message like the following:
[URL omitted] Please copy and paste the above URL into your web browser and follow the instructions to retrieve an authentication code.
Follow the instructions in the message and paste the authentication code on the command line.
API
Use the projects.locations.transferConfigs.create method and supply an instance of the TransferConfig resource.
Java
Before trying this sample, follow the Java setup instructions in the BigQuery quickstart using client libraries. For more information, see the BigQuery Java API reference documentation.
To authenticate to BigQuery, set up Application Default Credentials. For more information, see Set up authentication for client libraries.
Python
Before trying this sample, follow the Python setup instructions in the BigQuery quickstart using client libraries. For more information, see the BigQuery Python API reference documentation.
To authenticate to BigQuery, set up Application Default Credentials. For more information, see Set up authentication for client libraries.
Set up scheduled queries with a service account
Java
Before trying this sample, follow the Java setup instructions in the BigQuery quickstart using client libraries. For more information, see the BigQuery Java API reference documentation.
To authenticate to BigQuery, set up Application Default Credentials. For more information, see Set up authentication for client libraries.
Python
Before trying this sample, follow the Python setup instructions in the BigQuery quickstart using client libraries. For more information, see the BigQuery Python API reference documentation.
To authenticate to BigQuery, set up Application Default Credentials. For more information, see Set up authentication for client libraries.
View scheduled query status
Console
To view the status of your scheduled queries, in the navigation menu, click Scheduling and filter for Scheduled Query. Click a scheduled query to get more details about it.
bq
Scheduled queries are a kind of transfer. To show the details of a scheduled query, you can first use the bq command-line tool to list your transfer configurations.
Enter the bq ls command and supply the transfer flag --transfer_config. The following flags are also required:
--transfer_location
For example:
bq ls \ --transfer_config \ --transfer_location=us To show the details of a single scheduled query, enter the bq show command and supply the transfer_path for that scheduled query or transfer config.
For example:
bq show \ --transfer_config \ projects/862514376110/locations/us/transferConfigs/5dd12f26-0000-262f-bc38-089e0820fe38 API
Use the projects.locations.transferConfigs.list method and supply an instance of the TransferConfig resource.
Java
Before trying this sample, follow the Java setup instructions in the BigQuery quickstart using client libraries. For more information, see the BigQuery Java API reference documentation.
To authenticate to BigQuery, set up Application Default Credentials. For more information, see Set up authentication for client libraries.
Python
Before trying this sample, follow the Python setup instructions in the BigQuery quickstart using client libraries. For more information, see the BigQuery Python API reference documentation.
To authenticate to BigQuery, set up Application Default Credentials. For more information, see Set up authentication for client libraries.
Update scheduled queries
Console
To update a scheduled query, follow these steps:
- In the navigation menu, click Scheduled queries or Scheduling.
- In the list of scheduled queries, click the name of the query that you want to change.
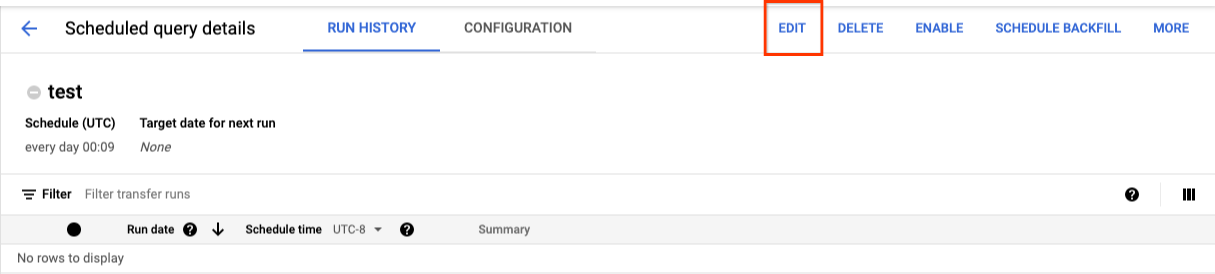
- On the Scheduled query details page that opens, click Edit.
- Optional: Change the query text in the query editing pane.
- Click Schedule query and then select Update scheduled query.
- Optional: Change any other scheduling options for the query.
- Click Update.
bq
Scheduled queries are a kind of transfer. To update scheduled query, you can use the bq command-line tool to make a transfer configuration.
Enter the bq update command with the required --transfer_config flag.
Optional flags:
--project_idis your project ID. If--project_idisn't specified, the default project is used.--scheduleis how often you want the query to run. If--scheduleisn't specified, the default is 'every 24 hours' based on creation time.--service_account_nameonly takes effect if--update_credentialsis also set. For more information, see Update scheduled query credentials.--target_dataset(optional for DDL and DML queries) is an alternative way to name the target dataset for the query results, when used with DDL and DML queries.--display_nameis the name for the scheduled query.--paramsthe parameters for the created transfer configuration in JSON format. For example: --params='{"param":"param_value"}'.--destination_kms_keyspecifies the key resource ID for the Cloud KMS key if you use a customer-managed encryption key (CMEK) for this transfer. For information about how customer-managed encryption keys (CMEK) works with the BigQuery Data Transfer Service, see Specify encryption key with scheduled queries.
bqupdate\ --target_dataset=dataset\ --display_name=name\ --params='parameters' --transfer_config\RESOURCE_NAME
Replace the following:
dataset. The target dataset for the transfer configuration. This parameter is optional for DDL and DML queries. It is required for all other queries.name. The display name for the transfer configuration. The display name can be any value that you can identify later if you need to modify the query.parameters. Contains the parameters for the created transfer configuration in JSON format. For example:--params='{"param":"param_value"}'.- For a scheduled query, you must supply the
queryparameter. - The
destination_table_name_templateparameter is the name of your destination table. This parameter is optional for DDL and DML queries. It is required for all other queries. - For the
write_dispositionparameter, you can chooseWRITE_TRUNCATEto truncate (overwrite) the destination table orWRITE_APPENDto append the query results to the destination table. This parameter is optional for DDL and DML queries. It is required for all other queries.
- For a scheduled query, you must supply the
- Optional: The
--destination_kms_keyspecifies the key resource ID for the Cloud KMS key—for example,projects/project_name/locations/us/keyRings/key_ring_name/cryptoKeys/key_name. RESOURCE_NAME: The transfer's resource name (also referred to as the transfer configuration). If you don't know the transfer's resource name, find the resource name with:bq ls --transfer_config --transfer_location=location.
For example, the following command updates a scheduled query transfer configuration named My Scheduled Query using the query SELECT 1 from mydataset.test. The destination table mytable is truncated for every write, and the target dataset is mydataset:
bq update \ --target_dataset=mydataset \ --display_name='My Scheduled Query' \ --params='{"query":"SELECT 1 from mydataset.test","destination_table_name_template":"mytable","write_disposition":"WRITE_TRUNCATE"}' --transfer_config \ projects/myproject/locations/us/transferConfigs/1234a123-1234-1a23-1be9-12ab3c456de7 API
Use the projects.transferConfigs.patch method and supply the transfer's Resource Name using the transferConfig.name parameter. If you don't know the transfer's Resource Name, use the bq ls --transfer_config --transfer_location=location command to list all transfers or call the projects.locations.transferConfigs.list method and supply the project ID using the parent parameter.
Java
Before trying this sample, follow the Java setup instructions in the BigQuery quickstart using client libraries. For more information, see the BigQuery Java API reference documentation.
To authenticate to BigQuery, set up Application Default Credentials. For more information, see Set up authentication for client libraries.
Python
Before trying this sample, follow the Python setup instructions in the BigQuery quickstart using client libraries. For more information, see the BigQuery Python API reference documentation.
To authenticate to BigQuery, set up Application Default Credentials. For more information, see Set up authentication for client libraries.
Update scheduled queries with ownership restrictions
If you try to update a scheduled query you don't own, the update might fail with the following error message:
Cannot modify restricted parameters without taking ownership of the transfer configuration.
The owner of the scheduled query is the user associated with the scheduled query or the user who has access to the service account associated with the scheduled query. The associated user can be seen in the configuration details of the scheduled query. For information on how to update the scheduled query to take ownership, see Update scheduled query credentials. To grant users access to a service account, you must have the Service Account user role.
Any user who is not the owner of the scheduled query, but has access to all resources mentioned by the query, might still be allowed to update the query. This scenario is only supported if the query can be validated within a minute or two. Otherwise, you get the same error message mentioned previously. If the query is too complex, you can instead update the scheduled query credentials to take direct ownership of the scheduled query or to use a service account.
Update scheduled query credentials
If you're scheduling an existing query, you might need to update the user credentials on the query. Credentials are automatically up to date for new scheduled queries.
Some other situations that could require updating credentials include the following:
- You want to query Google Drive data in a scheduled query.
You receive an INVALID_USER error when you attempt to schedule the query:
Error code 5 : Authentication failure: User Id not found. Error code: INVALID_USERIDYou receive the following restricted parameters error when you attempt to update the query:
Cannot modify restricted parameters without taking ownership of the transfer configuration.
Console
To refresh the existing credentials on a scheduled query:
Find and view the status of a scheduled query.
Click the MORE button and select Update credentials.
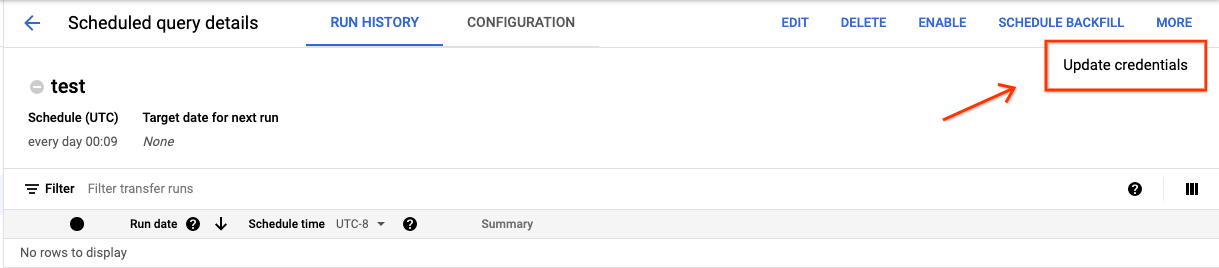
Allow 10 to 20 minutes for the change to take effect. You might need to clear your browser's cache.
bq
Scheduled queries are a kind of transfer. To update the credentials of a scheduled query, you can use the bq command-line tool to update the transfer configuration.
Enter the bq update command and supply the transfer flag --transfer_config. The following flags are also required:
--update_credentials
Optional flag:
--service_account_nameis for authenticating your scheduled query with a service account instead of your individual user account.
For example, the following command updates a scheduled query transfer configuration to authenticate as a service account:
bqupdate\--update_credentials \--service_account_name=abcdef-test-sa@abcdef-test.iam.gserviceaccount.com --transfer_config \projects/myproject/locations/us/transferConfigs/1234a123-1234-1a23-1be9-12ab3c456de7Java
Before trying this sample, follow the Java setup instructions in the BigQuery quickstart using client libraries. For more information, see the BigQuery Java API reference documentation.
To authenticate to BigQuery, set up Application Default Credentials. For more information, see Set up authentication for client libraries.
Python
Before trying this sample, follow the Python setup instructions in the BigQuery quickstart using client libraries. For more information, see the BigQuery Python API reference documentation.
To authenticate to BigQuery, set up Application Default Credentials. For more information, see Set up authentication for client libraries.
Set up a manual run on historical dates
In addition to scheduling a query to run in the future, you can also trigger immediate runs manually. Triggering an immediate run would be necessary if your query uses the run_date parameter, and there were issues during a prior run.
For example, every day at 09:00 you query a source table for rows that match the current date. However, you find that data wasn't added to the source table for the last three days. In this situation, you can set the query to run on historical data within a date range that you specify. Your query runs using combinations of run_date and run_time parameters that correspond to the dates you configured in your scheduled query.
After setting up a scheduled query, here's how you can run the query by using a historical date range:
Console
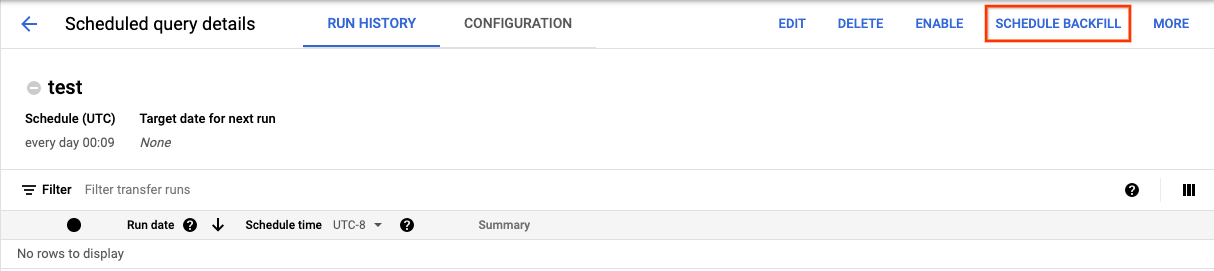
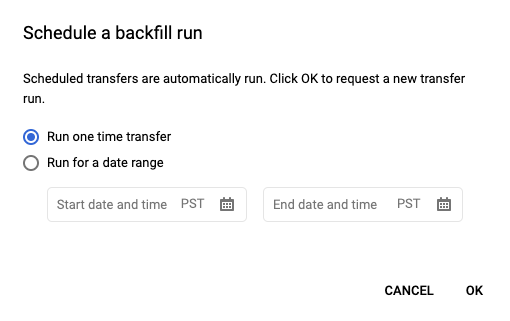
After clicking Schedule to save your scheduled query, you can click the Scheduled queries button to see the list of scheduled queries. Click any display name to see the query schedule's details. At the top right of the page, click Schedule backfill to specify a historical date range.
The chosen runtimes are all within your selected range, including the first date and excluding the last date.
Example 1
Your scheduled query is set to run every day 09:00 Pacific Time. You're missing data from January 1, January 2, and January 3. Choose the following historic date range:
Start Time = 1/1/19End Time = 1/4/19
Your query runs using run_date and run_time parameters that correspond to the following times:
- 1/1/19 09:00 Pacific Time
- 1/2/19 09:00 Pacific Time
- 1/3/19 09:00 Pacific Time
Example 2
Your scheduled query is set to run every day 23:00 Pacific Time. You're missing data from January 1, January 2, and January 3. Choose the following historic date ranges (later dates are chosen because UTC has a different date at 23:00 Pacific Time):
Start Time = 1/2/19End Time = 1/5/19
Your query runs using run_date and run_time parameters that correspond to the following times:
- 1/2/19 06:00 UTC, or 1/1/2019 23:00 Pacific Time
- 1/3/19 06:00 UTC, or 1/2/2019 23:00 Pacific Time
- 1/4/19 06:00 UTC, or 1/3/2019 23:00 Pacific Time
After setting up manual runs, refresh the page to see them in the list of runs.
bq
To manually run the query on a historical date range:
Enter the bq mk command and supply the transfer run flag --transfer_run. The following flags are also required:
--start_time--end_time
bqmk\ --transfer_run\ --start_time='start_time'\ --end_time='end_time'\resource_name
Replace the following:
start_timeandend_time. Timestamps that end in Z or contain a valid time zone offset. Examples:- 2017-08-19T12:11:35.00Z
- 2017-05-25T00:00:00+00:00
resource_name. The scheduled query's (or transfer's) Resource Name. The Resource Name is also known as the transfer configuration.
For example, the following command schedules a backfill for scheduled query resource (or transfer configuration): projects/myproject/locations/us/transferConfigs/1234a123-1234-1a23-1be9-12ab3c456de7.
bq mk \ --transfer_run \ --start_time 2017-05-25T00:00:00Z \ --end_time 2017-05-25T00:00:00Z \ projects/myproject/locations/us/transferConfigs/1234a123-1234-1a23-1be9-12ab3c456de7 For more information, see bq mk --transfer_run.
API
Use the projects.locations.transferConfigs.scheduleRun method and supply a path of the TransferConfig resource.
Java
Before trying this sample, follow the Java setup instructions in the BigQuery quickstart using client libraries. For more information, see the BigQuery Java API reference documentation.
To authenticate to BigQuery, set up Application Default Credentials. For more information, see Set up authentication for client libraries.
Python
Before trying this sample, follow the Python setup instructions in the BigQuery quickstart using client libraries. For more information, see the BigQuery Python API reference documentation.
To authenticate to BigQuery, set up Application Default Credentials. For more information, see Set up authentication for client libraries.
Delete scheduled queries
Console
To delete a scheduled query on the Scheduled queries page of the Google Cloud console, do the following:
- In the navigation menu, click Scheduled queries.
- In the list of scheduled queries, click the name of the scheduled query that you want to delete.
On the Scheduled query details page, click Delete.

Alternatively, you can delete a scheduled query on the Scheduling page of the Google Cloud console:
- In the navigation menu, click Scheduling.
- In the list of scheduled queries, click the Actions menu for the scheduled query that you want to delete.
Select Delete.

Java
Before trying this sample, follow the Java setup instructions in the BigQuery quickstart using client libraries. For more information, see the BigQuery Java API reference documentation.
To authenticate to BigQuery, set up Application Default Credentials. For more information, see Set up authentication for client libraries.
Python
Before trying this sample, follow the Python setup instructions in the BigQuery quickstart using client libraries. For more information, see the BigQuery Python API reference documentation.
To authenticate to BigQuery, set up Application Default Credentials. For more information, see Set up authentication for client libraries.
Disable or enable scheduled queries
To pause the scheduled runs of a selected query without deleting the schedule, you can disable the schedule.
To disable a schedule for a selected query, follow these steps:
- In the navigation menu of the Google Cloud console, click Scheduling.
- In the list of scheduled queries, click the Actions menu for the scheduled query that you want to disable.
Select Disable.

To enable a disabled scheduled query, click the Actions menu for the scheduled query that you want to enable and select Enable.
Quotas
Scheduled queries are executed with the creator's credentials and project, as if you were executing the query yourself. Scheduled queries are always run as batch query jobs.
Although scheduled queries use features of BigQuery Data Transfer Service, they are not transfers and are not subject to the load jobs quota. Scheduled queries are subject to the same BigQuery quotas and limits as manual queries.
Pricing
Scheduled queries are priced the same as manual BigQuery queries.
Supported regions
Scheduled queries are supported in the following locations.
Regions
The following table lists the regions in the Americas where BigQuery is available.| Region description | Region name | Details |
|---|---|---|
| Columbus, Ohio | us-east5 | |
| Dallas | us-south1 | |
| Iowa | us-central1 | |
| Las Vegas | us-west4 | |
| Los Angeles | us-west2 | |
| Mexico | northamerica-south1 | |
| Montréal | northamerica-northeast1 | |
| Northern Virginia | us-east4 | |
| Oregon | us-west1 | |
| Salt Lake City | us-west3 | |
| São Paulo | southamerica-east1 | |
| Santiago | southamerica-west1 | |
| South Carolina | us-east1 | |
| Toronto | northamerica-northeast2 | |
| Region description | Region name | Details |
|---|---|---|
| Delhi | asia-south2 | |
| Hong Kong | asia-east2 | |
| Jakarta | asia-southeast2 | |
| Melbourne | australia-southeast2 | |
| Mumbai | asia-south1 | |
| Osaka | asia-northeast2 | |
| Seoul | asia-northeast3 | |
| Singapore | asia-southeast1 | |
| Sydney | australia-southeast1 | |
| Taiwan | asia-east1 | |
| Tokyo | asia-northeast1 |
| Region description | Region name | Details |
|---|---|---|
| Belgium | europe-west1 | |
| Berlin | europe-west10 | |
| Finland | europe-north1 | |
| Frankfurt | europe-west3 | |
| London | europe-west2 | |
| Madrid | europe-southwest1 | |
| Milan | europe-west8 | |
| Netherlands | europe-west4 | |
| Paris | europe-west9 | |
| Stockholm | europe-north2 | |
| Turin | europe-west12 | |
| Warsaw | europe-central2 | |
| Zürich | europe-west6 |
| Region description | Region name | Details |
|---|---|---|
| Dammam | me-central2 | |
| Doha | me-central1 | |
| Tel Aviv | me-west1 |
| Region description | Region name | Details |
|---|---|---|
| Johannesburg | africa-south1 |
Multi-regions
The following table lists the multi-regions where BigQuery is available.| Multi-region description | Multi-region name |
|---|---|
| Data centers within member states of the European Union1 | EU |
| Data centers in the United States2 | US |
1 Data located in the EU multi-region is only stored in one of the following locations: europe-west1 (Belgium) or europe-west4 (Netherlands). The exact location in which the data is stored and processed is determined automatically by BigQuery.
2 Data located in the US multi-region is only stored in one of the following locations: us-central1 (Iowa), us-west1 (Oregon), or us-central2 (Oklahoma). The exact location in which the data is stored and processed is determined automatically by BigQuery.
What's next
- For an example of a scheduled query that uses a service account and includes the
@run_dateand@run_timeparameters, see Creating table snapshots with a scheduled query.