Kaleidoscopico Shows Off Pi Pico’s Capabilities

In the early days of computing, and well into the era where home computers were common but not particularly powerful, programming these machines was a delicate balance of managing hardware with getting the most out of the software. Memory had to be monitored closely, clock cycles taken into account, and even video outputs had to be careful not to overwhelm the processor. This can seem foreign in the modern world where double-digit gigabytes of memory is not only common, it’s expected, but if you want to hone your programming skills there’s no better way to do it than with the limitations imposed by something like a retro computer or a Raspberry Pi Pico.

This project is called Kaleidoscopio, built by [Linus Åkesson] aka [lft] and goes deep into the hardware of the Pi Pico in order to squeeze as much out of the small, inexpensive platform as possible. The demo is written with 17,000 lines of assembly using the RISC-V instruction set. The microcontroller has two cores on it, with one core acting as the computer’s chipset and the other acts as the CPU, rendering the effects. The platform has no dedicated audio or video components, so everything here is done in software using this setup to act as a PC from the 80s might. In this case, [lft] is taking inspiration from the Amiga platform, his favorite of that era.

The only hardware involved in this project apart from the Pi Pico itself are a few resistors, an audio jack, and a VGA port, further demonstrating that the software is the workhorse in this build. It’s impressive not only for wringing out as much as possible from the platform but for using the arguably weaker RISC-V cores instead of the ARM cores, as the Pi Pico includes both. [lft] goes into every detail on the project’s page as well, for those who are still captivated by the era of computer programming where every bit mattered. For more computing demos like this, take a look at this one which is based on [lft]’s retrocomputer of choice, the Amiga.

Continue reading “Kaleidoscopico Shows Off Pi Pico’s Capabilities”

A Pi-Based LiDAR Scanner

Although there are plenty of methods for effectively imaging a 3D space, LIDAR is widely regarded as one of the most effective methods. These systems use a rapid succession of laser pulses over a wide area to create an accurate 3D map. Early LIDAR systems were cumbersome and expensive but as the march of time continues on, these systems have become much more accessible to the average person. So much so that you can quickly attach one to a Raspberry Pi and perform LiDAR imaging for a very reasonable cost.

This software suite is a custom serial driver and scanning system for the Raspberry Pi, designed to work with LDRobot LIDAR modules like the LD06, LD19, and STL27L. Although still in active development, it offers an impressive set of features: real-time 2D visualizations, vertex color extraction, generation of 360-degree panoramic maps using fisheye camera images, and export capabilities for integration with other tools. The hardware setup includes a stepper motor for quick full-area scanning, and power options that include either a USB battery bank or a pair of 18650 lithium cells—making the system portable and self-contained during scans.

LIDAR systems are quickly becoming a dominant player for anything needing to map out or navigate a complex 3D space, from self-driving cars to small Arduino-powered robots. The capabilities a system like this brings are substantial for a reasonable cost, and we expect to see more LiDAR modules in other hardware as the technology matures further.

Thanks to [Dirk] for the tip!

GLaDOS Potato Assistant

This Potato Virtual Assistant Is Fully Baked

There are a number of reasons you might want to build your own smart speaker virtual assistant. Usually, getting your weather forecast from a snarky, malicious AI potato isn’t one of them, unless you’re a huge Portal fan like [Binh Pham].

[Binh Pham] built the potato incarnation of GLaDOS from the Portal 2 video game with the help of a ReSpeaker Light kit, an ESP32-based board designed for speech recognition and voice control, and as an interface for home assistant running on a Raspberry Pi.

He resisted the temptation to use a real potato as an enclosure and wisely opted instead to print one from a 3D file he found on Thingiverse of the original GLaDOS potato. Providing the assistant with the iconic synthetic voice of GLaDOS was a matter of repackaging an existing voice model for use with Home Assistant.

Of course all of this attention to detail would be for naught if you had to refer to the assistant as “Google” or “Alexa” to get its attention. A bit of custom modelling and on-device wake word detection, and the cyborg tuber was ready to switch lights on and off with it’s signature sinister wit.

We’ve seen a number of projects that brought Portal objectsto life for fans of the franchise to enjoy, even an assistant based on another version of the GLaDOS the character. This one adds a dimension of absurdity to the collection.

Continue reading “This Potato Virtual Assistant Is Fully Baked”

Jenny’s (Not Quite) Daily Drivers: Raspberry Pi 1

An occasional series of mine on these pages has been Daily Drivers, in which I try out operating systems from the point of view of using them for my everyday Hackaday work. It has mostly featured esoteric or lesser-used systems, some of which have been unexpected gems and others have been not quite ready for the big time.

Today I’m testing another system, but it’s not quite the same as the previous ones. Instead I’m looking at a piece of hardware, and I’m looking at it for use in my computing projects rather than as my desktop OS. You’ll all be familiar with it: the original Raspberry Pi appeared at the end of February 2012, though it would be May of that year before all but a lucky few received one. Since then it has become a global phenomenon and spawned a host of ever-faster successors, but what of that original board from 2012 here in 2025? If you have a working piece of hardware it makes sense to use it, so how does the original stack up? I have a project that needs a Linux machine, so I’m dusting off a Model B and going down memory lane.

Continue reading “Jenny’s (Not Quite) Daily Drivers: Raspberry Pi 1”

Self-Hosting A Cluster On Old Phones

The phones most of us carry around in our pockets every day hold a surprising amount of computing power. It’s somewhat taken for granted now that we can get broadband in our hands in most places; so much so that when one of these devices has reached the end of its life it’s often just tossed in a junk drawer even though its capabilities would have been miraculous only 20 years ago. But those old phones can still be put to good use though, and [Denys] puts a few of them back to work running a computing cluster.

Perhaps the most significant flaw of smartphones, though, is that most of them are locked down so much by their manufacturers that it’s impossible to load new operating systems on them. For this project you’ll need to be lucky enough (or informed enough) to have a phone with an unlockable bootloader so that a smartphone-oriented Linux distribution called postmarketOS can be installed. With this nearly full-fledged Linux distribution to work from, the phones can be accessed by ssh and then used to run Kubernetes for the computing cluster. [Denys] has three phones in his cluster that run a few self-hosted services for him.

[Denys] also points out in his guide that having a phone that can run postmarketOS might save some money when compared to buying a Raspberry Pi to run the same service, and the phones themselves can often be more powerful as well. This is actually something that a few others have noted in the past as well. He’s gone into a considerable amount of detail on how to set this up, so if you have a few old smartphones gathering dust, or even those with broken screens or other physical problems where the underlying computing resources are still usable, it’s a great way to put these machines back to work.

Thanks to [mastro Gippo] for the tip!

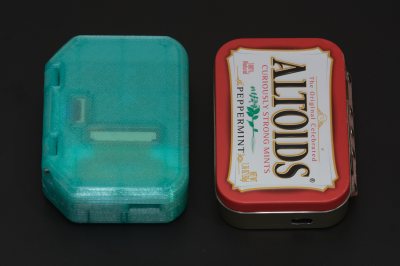
A Cute Handheld Gaming Device That You Can Build In An Altoids Tin

The MintyPi was a popular project that put a Raspberry Pi inside an Altoids tin to make a pocketable gaming handheld. Unfortunately, it’s not the easiest build to replicate anymore, but [jackw01] was still a fan of the format. Thus was born the Pi Tin—a clamshell handheld for portable fun!

Neat, huh? More pocket-sized than the Game Boy Pocket.

The build is based around the Raspberry Pi Zero 2W, which packs more power than the original Pi Zero into the same compact form factor. It’s combined with a 320 x 240 TFT LCD screen and a 2000 mAh lithium-polymer battery which provides power on the go.

There are also a pair of custom PCBs used to lace everything together, including the action buttons, D-pad, and power management hardware. Depending on your tastes, you have two main enclosure options. You can use the neat 3D printed clamshell seen here in beautiful teal, or you can go with the classic Altoids tin build—just be careful when you’re cutting it to suit! Files can be found on GitHub for the curious.

We love a good handheld project around these parts; it’s particularly awesome how much gaming you can fit in your pocket given the magic of the Raspberry Pi and modern emulation. If you’re cooking up your own little retro rig, don’t hesitate to let us know!

Hacking Digital Calipers For Automated Measurements And Sorta-Micron Accuracy

We’ll take a guess that most readers have a set of digital calipers somewhere close to hand right now. The cheapest ones tend to be a little unsatisfying in the hand, a bit crusty and crunchy to use. But as [Matthias Wandel] shows us, these budget tools are quite hackable and a lot more precise than they appear to be.

[Matthias] is perhaps best known around these parts for making machine tools using mainly wood. It’s an unconventional material for things like the CNC router he loves to hate, but he makes it work through a combination of clever engineering and a willingness to work within the limits of the machine. To assess those limits, he connected some cheap digital calipers to a Raspberry Pi by hacking the serial interface that seems to be built into all of these tools. His particular calipers output a pair of 24-bit words over a synchronous serial connection a couple of times per second, but at a level too low to be read by the Pi. He solved this with a clever resistor ladder to shift the signals to straddle the 1.8 volt transition on the Pi, and after solving some noise problems with a few strategically placed capacitors and some software debouncing, he was gathering data on his Pi.

Although his setup was fine for the measurements he needed to make, [Matthias] couldn’t help falling down the rabbit hole of trying to milk better resolution from the calipers. On paper, the 24-bit output should provide micron-ish resolution, but sadly, the readings seem to fluctuate rapidly between two levels, making it difficult to obtain an average quickly enough to be useful. Still, it’s a good exercise, and overall, these hacks should prove handy for anyone who wants to dip a toe into automated metrology on a budget.

Continue reading “Hacking Digital Calipers For Automated Measurements And Sorta-Micron Accuracy”