Amazon Web Services (AWS)
- SSH to EC2
- Boto
- S3cmd
- s3-parallel-put
- S3DistCp
- Redshift
- Kinesis
- Lambda
SSH to EC2
Connect to an Ubuntu EC2 instance through SSH with the given key:
!ssh -i key.pem ubuntu@ipaddress Connect to an Amazon Linux EC2 instance through SSH with the given key:
!ssh -i key.pem ec2-user@ipaddress !pip install Boto Configure boto by creating a ~/.boto file with the following:
aws_access_key_id=YOURACCESSKEYaws_secret_access_key=YOURSECRETKEYWork with S3:
importbotos3=boto.connect_s3()Work with EC2:
importboto.ec2ec2=boto.ec2.connect_to_region('us-east-1')Create a bucket and put an object in that bucket:
importbotoimporttimes3=boto.connect_s3()# Create a new bucket. Buckets must have a globally unique name (not just# unique to your account).bucket=s3.create_bucket('boto-demo-%s'%int(time.time()))# Create a new key/value pair.key=bucket.new_key('mykey')key.set_contents_from_string("Hello World!")# Sleep to ensure the data is eventually there.# This is often referred to as "S3 eventual consistency".time.sleep(2)# Retrieve the contents of ``mykey``.printkey.get_contents_as_string()# Delete the key.key.delete()# Delete the bucket.bucket.delete()S3cmd
Before I discovered S3cmd, I had been using the S3 console to do basic operations and boto to do more of the heavy lifting. However, sometimes I just want to hack away at a command line to do my work.
I've found S3cmd to be a great command line tool for interacting with S3 on AWS. S3cmd is written in Python, is open source, and is free even for commercial use. It offers more advanced features than those found in the AWS CLI.
Install s3cmd:
!sudo apt-get install s3cmd Running the following command will prompt you to enter your AWS access and AWS secret keys. To follow security best practices, make sure you are using an IAM account as opposed to using the root account.
I also suggest enabling GPG encryption which will encrypt your data at rest, and enabling HTTPS to encrypt your data in transit. Note this might impact performance.
!s3cmd --configure Frequently used S3cmds:
# List all buckets!s3cmd ls # List the contents of the bucket!s3cmd ls s3://my-bucket-name # Upload a file into the bucket (private)!s3cmd put myfile.txt s3://my-bucket-name/myfile.txt # Upload a file into the bucket (public)!s3cmd put --acl-public --guess-mime-type myfile.txt s3://my-bucket-name/myfile.txt # Recursively upload a directory to s3!s3cmd put --recursive my-local-folder-path/ s3://my-bucket-name/mydir/ # Download a file!s3cmd get s3://my-bucket-name/myfile.txt myfile.txt # Recursively download files that start with myfile!s3cmd --recursive get s3://my-bucket-name/myfile # Delete a file!s3cmd del s3://my-bucket-name/myfile.txt # Delete a bucket!s3cmd del --recursive s3://my-bucket-name/ # Create a bucket!s3cmd mb s3://my-bucket-name # List bucket disk usage (human readable)!s3cmd du -H s3://my-bucket-name/ # Sync local (source) to s3 bucket (destination)!s3cmd sync my-local-folder-path/ s3://my-bucket-name/ # Sync s3 bucket (source) to local (destination)!s3cmd sync s3://my-bucket-name/ my-local-folder-path/ # Do a dry-run (do not perform actual sync, but get information about what would happen)!s3cmd --dry-run sync s3://my-bucket-name/ my-local-folder-path/ # Apply a standard shell wildcard include to sync s3 bucket (source) to local (destination)!s3cmd --include '2014-05-01*' sync s3://my-bucket-name/ my-local-folder-path/ s3-parallel-put
s3-parallel-put is a great tool for uploading multiple files to S3 in parallel.
Install package dependencies:
!sudo apt-get install boto !sudo apt-get install git Clone the s3-parallel-put repo:
!git clone https://github.com/twpayne/s3-parallel-put.git Setup AWS keys for s3-parallel-put:
!exportAWS_ACCESS_KEY_ID=XXX !exportAWS_SECRET_ACCESS_KEY=XXX Sample usage:
!s3-parallel-put --bucket=bucket --prefix=PREFIX SOURCE Dry run of putting files in the current directory on S3 with the given S3 prefix, do not check first if they exist:
!s3-parallel-put --bucket=bucket --host=s3.amazonaws.com --put=stupid --dry-run --prefix=prefix/ ./ S3DistCp
S3DistCp is an extension of DistCp that is optimized to work with Amazon S3. S3DistCp is useful for combining smaller files and aggregate them together, taking in a pattern and target file to combine smaller input files to larger ones. S3DistCp can also be used to transfer large volumes of data from S3 to your Hadoop cluster.
To run S3DistCp with the EMR command line, ensure you are using the proper version of Ruby:
!rvm --default ruby-1.8.7-p374 The EMR command line below executes the following:
- Create a master node and slave nodes of type m1.small
- Runs S3DistCp on the source bucket location and concatenates files that match the date regular expression, resulting in files that are roughly 1024 MB or 1 GB
- Places the results in the destination bucket
!./elastic-mapreduce --create --instance-group master --instance-count 1\--instance-typem1.small--instance-groupcore--instance-count4 \ --instance-typem1.small--jar/home/hadoop/lib/emr-s3distcp-1.0.jar \ --args"--src,s3://my-bucket-source/,--groupBy,.*([0-9]{4}-01).*,\--dest,s3://my-bucket-dest/,--targetSize,1024"For further optimization, compression can be helpful to save on AWS storage and bandwidth costs, to speed up the S3 to/from EMR transfer, and to reduce disk I/O. Note that compressed files are not easy to split for Hadoop. For example, Hadoop uses a single mapper per GZIP file, as it does not know about file boundaries.
What type of compression should you use?
- Time sensitive job: Snappy or LZO
- Large amounts of data: GZIP
- General purpose: GZIP, as it’s supported by most platforms
You can specify the compression codec (gzip, lzo, snappy, or none) to use for copied files with S3DistCp with –outputCodec. If no value is specified, files are copied with no compression change. The code below sets the compression to lzo:
--outputCodec,lzoRedshift
Copy values from the given S3 location containing CSV files to a Redshift cluster:
copytable_namefrom's3://source/part'credentials'aws_access_key_id=XXX;aws_secret_access_key=XXX'csv;Copy values from the given location containing TSV files to a Redshift cluster:
copytable_namefrom's3://source/part'credentials'aws_access_key_id=XXX;aws_secret_access_key=XXX'csvdelimiter'\t';View Redshift errors:
select*fromstl_load_errors;Vacuum Redshift in full:
VACUUMFULL;Analyze the compression of a table:
analyzecompressiontable_name;Cancel the query with the specified id:
cancel18764;The CANCEL command will not abort a transaction. To abort or roll back a transaction, you must use the ABORT or ROLLBACK command. To cancel a query associated with a transaction, first cancel the query then abort the transaction.
If the query that you canceled is associated with a transaction, use the ABORT or ROLLBACK. command to cancel the transaction and discard any changes made to the data:
abort;Reference table creation and setup:
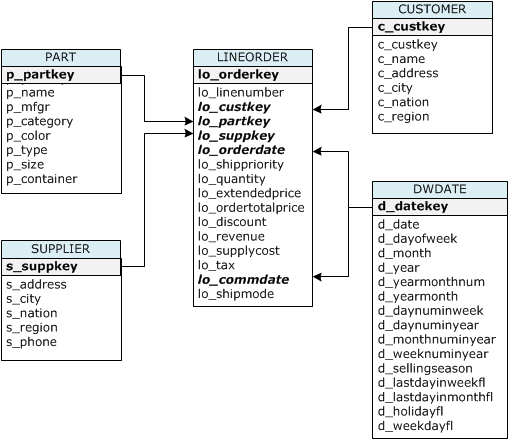
CREATETABLEpart(p_partkeyintegernotnullsortkeydistkey,p_namevarchar(22)notnull,p_mfgrvarchar(6)notnull,p_categoryvarchar(7)notnull,p_brand1varchar(9)notnull,p_colorvarchar(11)notnull,p_typevarchar(25)notnull,p_sizeintegernotnull,p_containervarchar(10)notnull);CREATETABLEsupplier(s_suppkeyintegernotnullsortkey,s_namevarchar(25)notnull,s_addressvarchar(25)notnull,s_cityvarchar(10)notnull,s_nationvarchar(15)notnull,s_regionvarchar(12)notnull,s_phonevarchar(15)notnull)diststyleall;CREATETABLEcustomer(c_custkeyintegernotnullsortkey,c_namevarchar(25)notnull,c_addressvarchar(25)notnull,c_cityvarchar(10)notnull,c_nationvarchar(15)notnull,c_regionvarchar(12)notnull,c_phonevarchar(15)notnull,c_mktsegmentvarchar(10)notnull)diststyleall;CREATETABLEdwdate(d_datekeyintegernotnullsortkey,d_datevarchar(19)notnull,d_dayofweekvarchar(10)notnull,d_monthvarchar(10)notnull,d_yearintegernotnull,d_yearmonthnumintegernotnull,d_yearmonthvarchar(8)notnull,d_daynuminweekintegernotnull,d_daynuminmonthintegernotnull,d_daynuminyearintegernotnull,d_monthnuminyearintegernotnull,d_weeknuminyearintegernotnull,d_sellingseasonvarchar(13)notnull,d_lastdayinweekflvarchar(1)notnull,d_lastdayinmonthflvarchar(1)notnull,d_holidayflvarchar(1)notnull,d_weekdayflvarchar(1)notnull)diststyleall;CREATETABLElineorder(lo_orderkeyintegernotnull,lo_linenumberintegernotnull,lo_custkeyintegernotnull,lo_partkeyintegernotnulldistkey,lo_suppkeyintegernotnull,lo_orderdateintegernotnullsortkey,lo_orderpriorityvarchar(15)notnull,lo_shippriorityvarchar(1)notnull,lo_quantityintegernotnull,lo_extendedpriceintegernotnull,lo_ordertotalpriceintegernotnull,lo_discountintegernotnull,lo_revenueintegernotnull,lo_supplycostintegernotnull,lo_taxintegernotnull,lo_commitdateintegernotnull,lo_shipmodevarchar(10)notnull);| Table name | Sort Key | Distribution Style |
|---|---|---|
| LINEORDER | lo_orderdate | lo_partkey |
| PART | p_partkey | p_partkey |
| CUSTOMER | c_custkey | ALL |
| SUPPLIER | s_suppkey | ALL |
| DWDATE | d_datekey | ALL |
When you create a table, you can specify one or more columns as the sort key. Amazon Redshift stores your data on disk in sorted order according to the sort key. How your data is sorted has an important effect on disk I/O, columnar compression, and query performance.
Choose sort keys for based on these best practices:
If recent data is queried most frequently, specify the timestamp column as the leading column for the sort key.
If you do frequent range filtering or equality filtering on one column, specify that column as the sort key.
If you frequently join a (dimension) table, specify the join column as the sort key.
When you create a table, you designate one of three distribution styles: KEY, ALL, or EVEN.
KEY distribution
The rows are distributed according to the values in one column. The leader node will attempt to place matching values on the same node slice. If you distribute a pair of tables on the joining keys, the leader node collocates the rows on the slices according to the values in the joining columns so that matching values from the common columns are physically stored together.
ALL distribution
A copy of the entire table is distributed to every node. Where EVEN distribution or KEY distribution place only a portion of a table's rows on each node, ALL distribution ensures that every row is collocated for every join that the table participates in.
EVEN distribution
The rows are distributed across the slices in a round-robin fashion, regardless of the values in any particular column. EVEN distribution is appropriate when a table does not participate in joins or when there is not a clear choice between KEY distribution and ALL distribution. EVEN distribution is the default distribution style.
Kinesis
Create a stream:
!aws kinesis create-stream --stream-name Foo --shard-count 1 --profile adminuser List all streams:
!aws kinesis list-streams --profile adminuser Get info about the stream:
!aws kinesis describe-stream --stream-name Foo --profile adminuser Put a record to the stream:
!aws kinesis put-record --stream-name Foo --data "SGVsbG8sIHRoaXMgaXMgYSB0ZXN0IDEyMy4=" --partition-key shardId-000000000000 --region us-east-1 --profile adminuser Get records from a given shard:
!SHARD_ITERATOR=$(aws kinesis get-shard-iterator --shard-id shardId-000000000000 --shard-iterator-type TRIM_HORIZON --stream-name Foo --query 'ShardIterator' --profile adminuser)awskinesisget-records--shard-iterator$SHARD_ITERATORDelete a stream:
!aws kinesis delete-stream --stream-name Foo --profile adminuser Lambda
List lambda functions:
!aws lambda list-functions \--regionus-east-1 \ --max-items10Upload a lambda function:
!aws lambda upload-function \--regionus-east-1 \ --function-namefoo \ --function-zipfile-path/foo.zip \ --roleIAM-role-ARN \ --modeevent \ --handlerfoo.handler \ --runtimenodejs \ --debugInvoke a lambda function:
!aws lambda invoke-async \--function-namefoo \ --regionus-east-1 \ --invoke-argsfoo.txt \ --debugUpdate a function:
!aws lambda update-function-configuration \--function-namefoo \ --regionus-east-1 \ --timeouttimeout-in-seconds \ Return metadata for a specific function:
!aws lambda get-function-configuration \--function-namefoo \ --regionus-east-1 \ --debugReturn metadata for a specific function along with a presigned URL that you can use to download the function's .zip file that you uploaded:
!aws lambda get-function \--function-namefoo \ --regionus-east-1 \ --debugAdd an event source:
!aws lambda add-event-source \--regionus-east-1 \ --function-nameProcessKinesisRecords \ --roleinvocation-role-arn \ --event-sourcekinesis-stream-arn \ --batch-size100Add permissions:
!aws lambda add-permission \--function-nameCreateThumbnail \ --regionus-west-2 \ --statement-idsome-unique-id \ --action"lambda:InvokeFunction" \ --principals3.amazonaws.com \ --source-arnarn:aws:s3:::sourcebucket \ --source-accountbucket-owner-account-idCheck policy permissions:
!aws lambda get-policy \--function-namefunction-nameDelete a lambda function:
!aws lambda delete-function \--function-namefoo \ --regionus-east-1 \ --debug